Settings
Click the gear icon in the upper right corner of the page to access the service settings.
The settings page includes the following tabs:
- General — settings for the filters for displaying documents in lists, task scheduling, and the signature text for outgoing emails.
- Print — settings for additional information to be displayed when printing documents and the print format for ruble and currency statements.
- Import — settings for documents imported into the service.
- Export — settings for documents exported from the service.
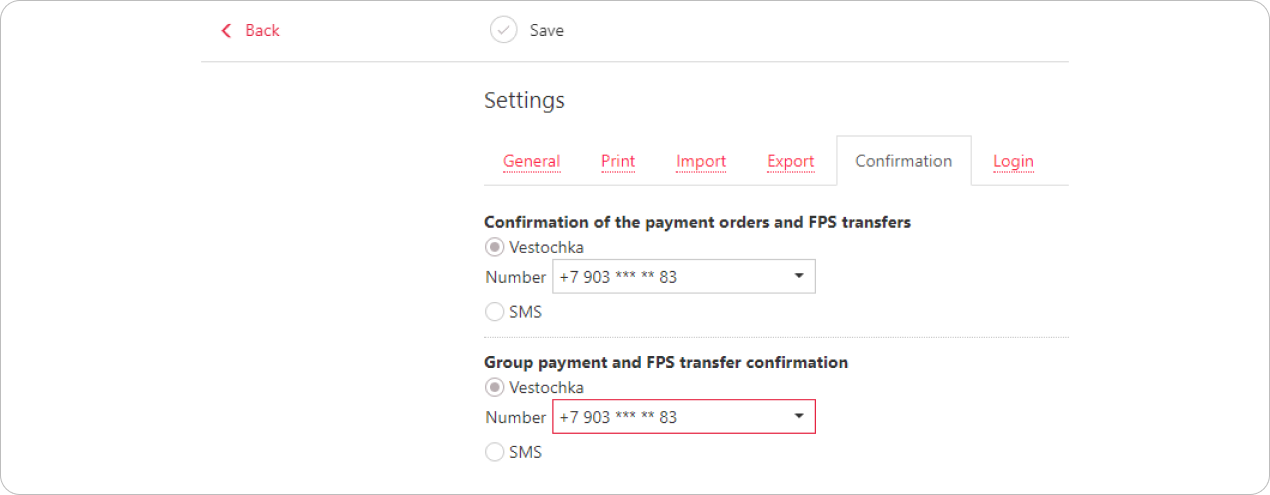
- Confirmation — document confirmation settings.
- Login — settings for signing in using a username and a password.
The import, export, print, and confirmation settings are saved separately for each corporate client when the service is used on a single computer for multiple organizations. To use individual settings for each client, save them at least once. The exchange folder paths are additionally saved on the Bank’s side.
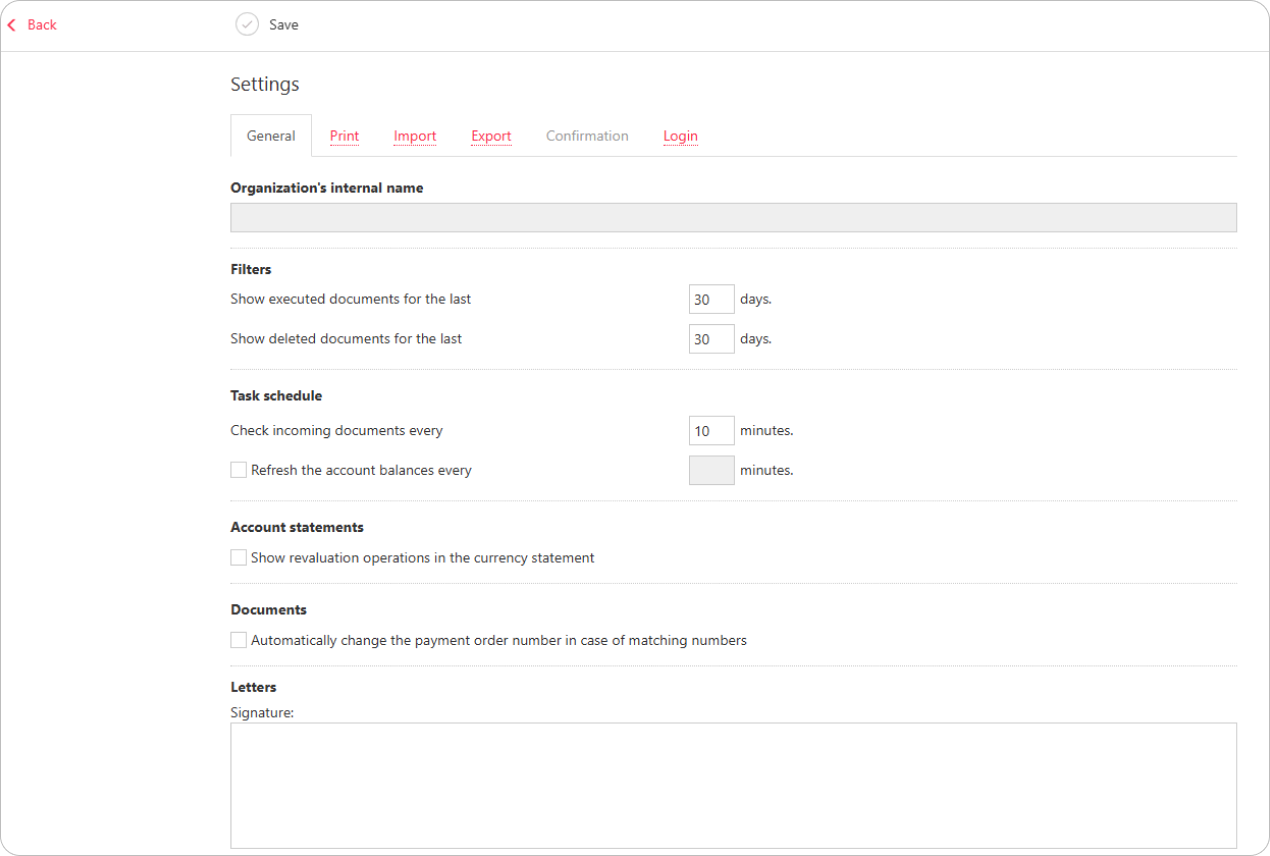
General tab
- Organization's internal name — the name assigned to the organization by the controlling company in the Financial Control Center.
- Filters — settings for the filters used to display all documents in lists for required dates.
- Task schedule — settings of the schedule applied to automatically checking incoming bank emails and updating account balances.
- Account statements — settings for the display of revaluation operations in currency account statements. If enabled, revaluation adjustments will appear in statements.
- Documents — whether to automatically change the payment order numbers in case they coincide.
- VAT rates — the setting is not used.
- Letters — text that will be added as a signature when sending emails to the Bank. Signatures are not added when creating emails through copying.
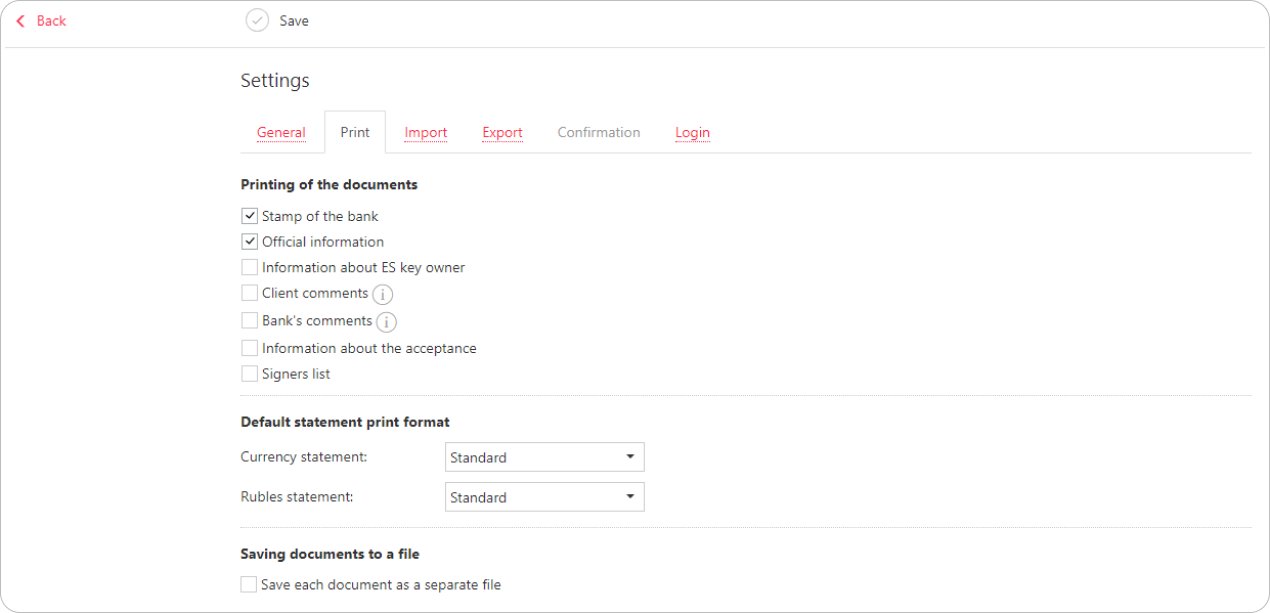
Print tab
-
Printing of the documents — additional information to display when printing documents and page orientation for ruble and currency statements:
- Stamp of the bank — bank details and document processing status.
- Official information — document identification number, electronic signature (ES) key identifier and validity period, and date and time when the document was moved to the Delivered status. This information is not printed for documents in the New or Signed status.
- Information about ES key owner — name of the ES owner who signed the document. This information is not printed for documents in the New status. In currency documents, the signer’s position is also printed.
- Client comments — printed only on payment orders.
- Bank's comments — printed on:
- Payment order
- Transfer order
- Interbank transfer
- Order for currency purchase
- Order for currency sale
- Order for currency conversion
- Order for transfer from the transit account
- Order for compulsory sale of foreign currency
- Currency operation information
- Letter
- Bargain confirmation
- Information about the acceptance — an acceptance stamp on payment orders with the accepting staff member's name, as well as acceptance date and time.
- Signers list — for documents with more than two signatures, the information on the first two signers appears on the main page, while all the signers will be listed on a separate page. The full list includes: signers' full names, positions, and their ES key identifiers. The exceptions include: payment orders, letters of credit applications, and a few others, where up to three signatures can be shown on the main page. On the forms where the signature block is missing (only the stamp block is used), the signers' names and positions are not printed.
-
Default statement print format — the default print format configuration for ruble and currency statements:
- Standard — general account information, transactions, and turnover summary for a requested period. The transaction list shows the following details: document number, TC, transaction date, debit, credit, correspondent bank details (recipient bank's BIC, name, and account), transaction purpose.
- Extended (landscape) — general account information, transactions, and daily and total turnover for a requested period. The transaction list shows the same information on transactions, but all transactions are grouped by day.
- Brief — general account information and transactions. The transaction list shows the following details: document number, TC, transaction date, debit, credit, correspondent bank details (recipient bank's BIC, name, and account). No information on the turnover is included.
-
Saving documents to a file — whether to save multiple documents as separate files or as a single file, with each document on a separate page.
This setting only applies to documents in the Statement section when selecting Save as PDF/RTF → Documents. For other documents, a single PDF/RTF file will be generated, with each document on a separate page.
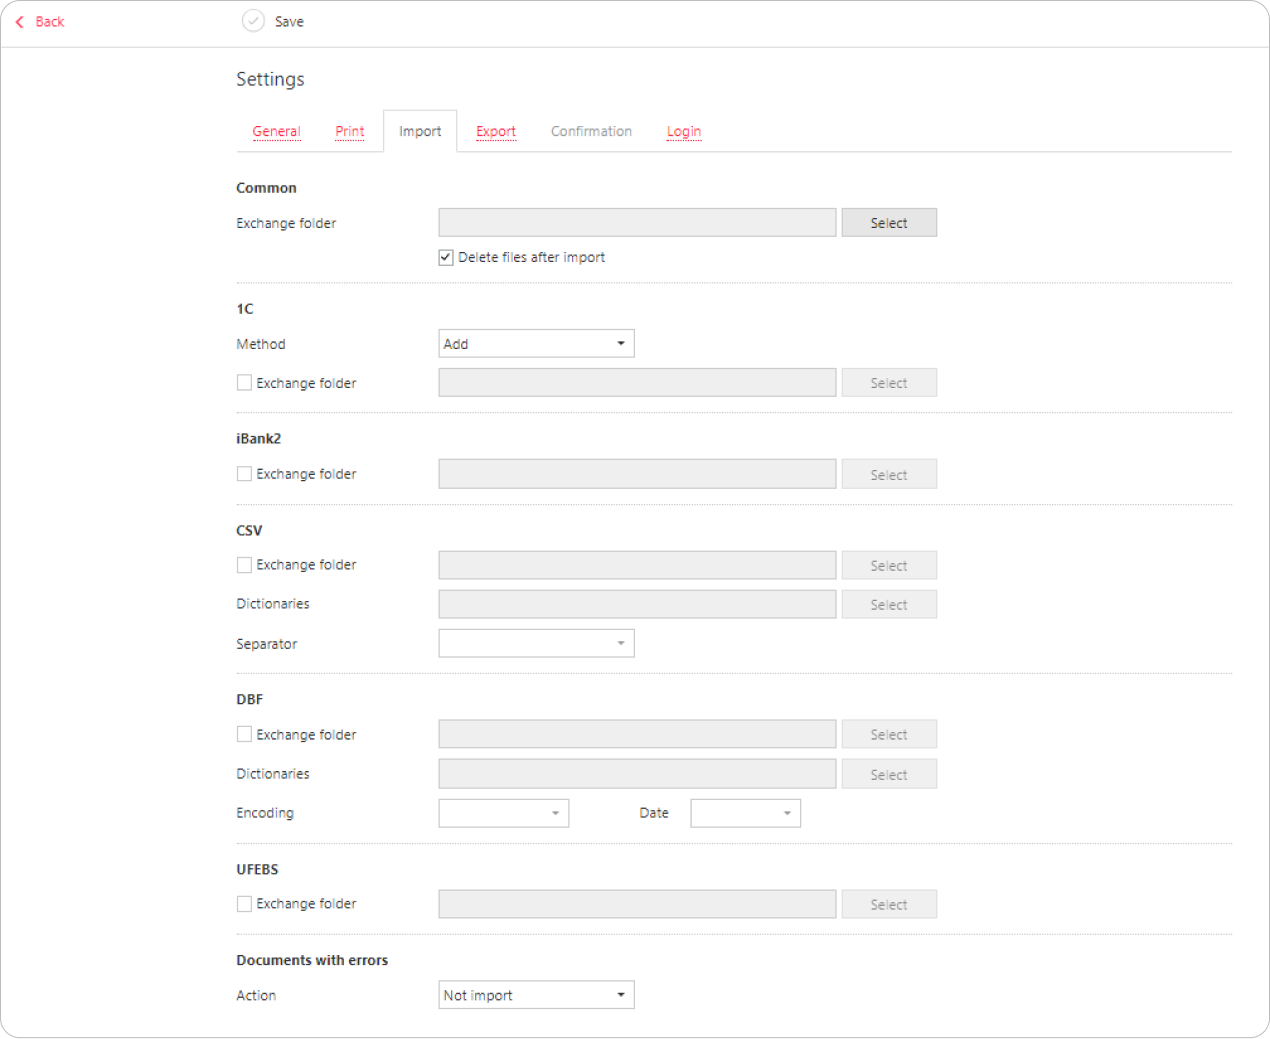
Import tab
-
Common — click Select to specify a common directory for importing documents of different formats. Check the Delete files after import option to optimize the import procedure.
-
1C — configure the import of documents in the 1C format. The following import methods are available:
- Add — documents from the import file are added to the service.
- Synchronize:
- The documents in the Draft status where the document date and account match the import file data are deleted.
- The documents in the New status missing in the import file are deleted.
- Other documents in the New status are replaced by the corresponding documents from the import file.
- The documents in the Rejected status for all previous dates are deleted.
- All other documents remain unchanged.
To select the import directory, enable the Exchange folder flag and click the Select button.
-
iBank2 and UFEBS — specify the directories from which documents in the iBank2 and UFEBS formats, respectively, will be imported. To select the import directory, enable the Exchange folder flag and click the Select button.
-
CSV — configure the import of documents in the CSV format. To select the import directory, enable the Exchange folder flag and click the Select button.
- Dictionaries — required for mapping fields in the CSV import file to the internet banking database. To select the dictionary folder, click the Select button.
- Separator — specify the separator used in the import file. Available options:
comma,tabulation,semicolon.
-
DBF — configure the import of documents in the DBF format. To select the import directory, enable the Exchange folder flag and click the Select button.
- Dictionaries — required for mapping fields in the import file to the internet banking database. To select the dictionary folder, click the Select button.
- Encoding — the encoding specified in the module settings must match the encoding of the import file. Available options:
DOS,Windows-1251. - Date — the date format specified in the service settings must match the format used in the import file.
-
Documents with errors — configure the import of documents containing incorrectly filled or missing required fields. The following import methods are available:
- Not import — do not import documents with errors in the import file.
- Save as draft — import documents with errors and assign them the Draft status.
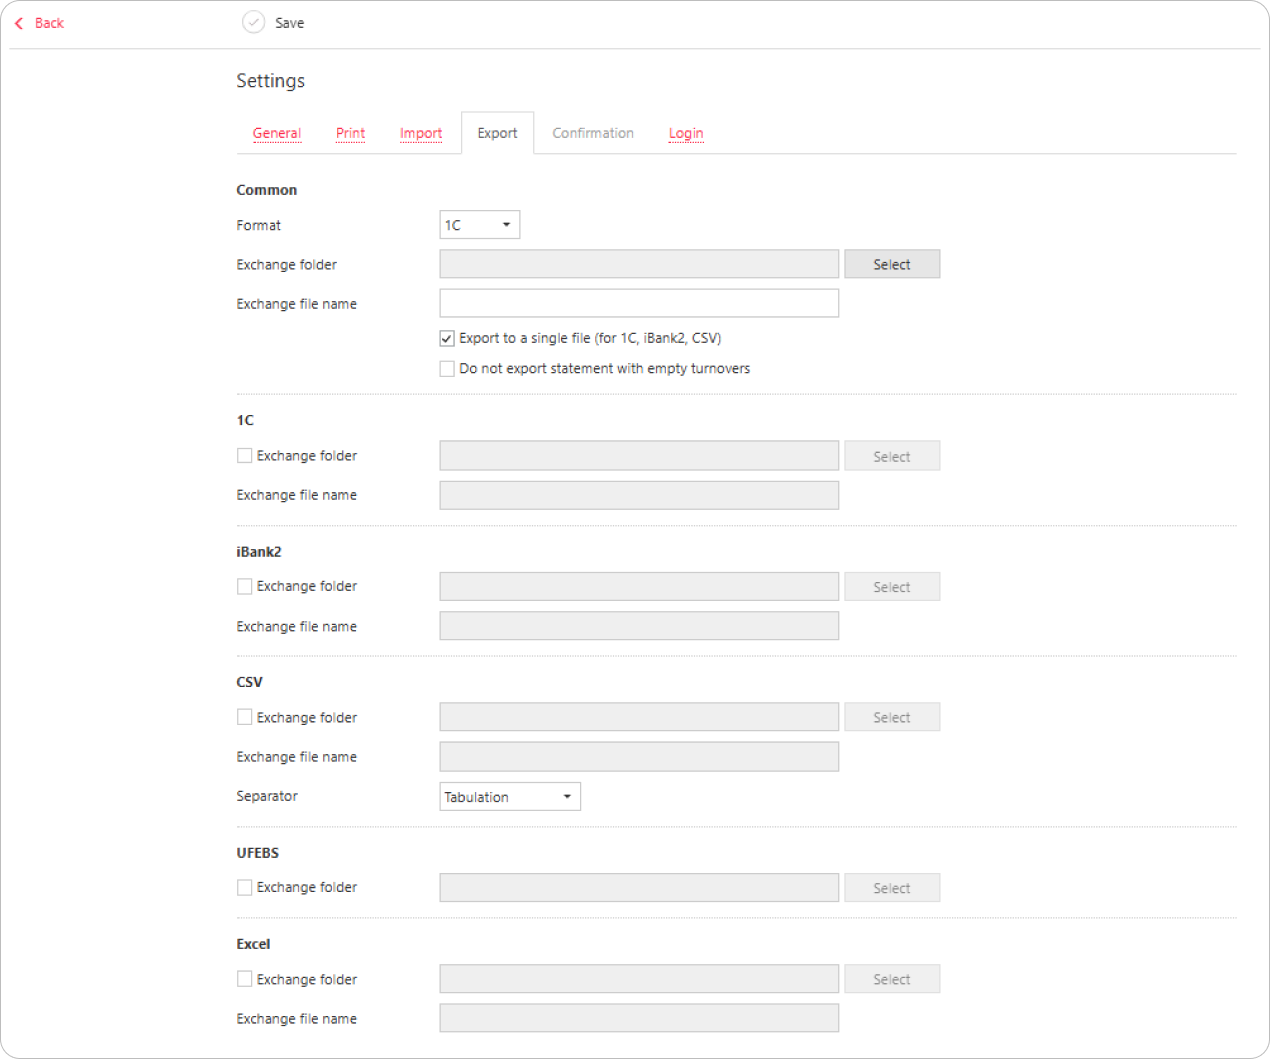
Export tab
-
Common — specify the general directory to which documents can be exported from the service. Select the required format from the dropdown menu. Click the Select button to choose the export directory. In the Exchange file name field, specify the name and extension of the exchange file (for example:
filename.txt).- The Export to the single file (for 1C, iBank2, CSV) flag allows exporting a single statement for all the accounts into one file. Otherwise, the export folder will contain as many files as there are accounts, each with the corresponding name.
- The Do not export statement with empty overturns flag allows exporting statements only for the accounts with transactions during the specified period. This setting applies to the 1C and iBank2 formats.
-
1C, iBank2, UFEBS, and Excel — specify the names and full paths to the files where data will be exported in the 1C, iBank2, UFEBS, and Excel formats, respectively. To select the export directory, click the Select button. In the Exchange file name field, specify the name and extension of the exchange file (for example:
filename.xls). -
CSV — configure the export of documents in the CSV format. To select the export directory, enable the Exchange folder flag and click the Select button. In the Exchange file name field, specify the name and extension of the exchange file (for example,
filename.csv). Specify a separator for data to use in the exported file. Available options:comma,tabulation,semicolon.
Confirmation tab
On this tab, you can specify the scope of application and the method for obtaining the confirmation code that will be used when confirming payment orders, trusted recipients, or bulk document confirmations.
Login tab
You can sign in to the internet banking using a login (email) and password.
To do this, fill in all the required fields.
To apply the configured settings, click the Save button.
